• Please review our updated Terms and Rules here

MicroVAX II failure on boot

lsi11al

Member
Joined
Apr 20, 2018
Messages
44
Location
Hebron, KY
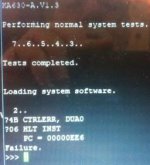
Fired up the MicroVAX and received the message as seen in the attachment.

MicroVAXII.jpg

So does this mean a problem with the interface, the RD53 drive, or possibly both? I will be setting the BA23 box up with an LSI-11/23 system but would like to know if there is a problem with the drive before I do so.

Thank you very much.

Al
 
My guess is that between the controller or the drive it is probably a lot more likely that something has gone bad with the RD53 over the years than it is that something has gone wrong with the controller. It has been reported by lots of people that a common problem in the RD53 is that the rubber bumper which is an end of motion stop for the head actuator inside the drive turns into sticky goo and prevents normal head motion.

What controller are you currently using, an M7555 RQDX3? Do you have any other storage devices, such as an RX50 or RX33 drive connected to the controller? If you could hook an RX50 or RX33 drive up to the controller then maybe you can get setup to run some VAX diagnostics which would provide more information. Although if you could boot from an RX50 or RX33 drive attached to the same controller that would pretty much mean the controller is ok and the problem is with the RD53.

If you already have an M8186 KDF11-A or an M8189 KDF11-B PDP-11/23 CPU and memory boards to swap in for the M7606 KA630 CPU and memory boards you could also try running PDP-11 XXDP diagnostics loaded through a TU58 emulator.

The MicroVAX has an M8639 controller and an M7513 extender. There is also an RX50 aboard. Assuming that the RX50 is OK I would need a bootable floppy with VAX diagnostics. Do you or someone have that available? I would, if possible, like to figure out what is wrong while the computer is still in the MicroVAX configuration. Once I swap out all the boards for the 11/23 configuration there will be other unknowns regarding the various boards that I will be swapping in (CPU, memory, serial interface, RQDX3).

Thank you!

Al
 
Al, do you have a PC with a 5.25-inch 1.2MB floppy drive that you can set up to boot into plain real mode DOS? I finally got around to trying to create some real RX50 format "MicroVAX Maintenance System - Diagnostic Release 1.10" floppy disks from images I found on the net a few years back.

www.headcrashers.org/comp/rx50/index.html
www.headcrashers.org/comp/rx50/uvax2diag1.img MicroVAX-II Diagnostics Disk 1
www.headcrashers.org/comp/rx50/uvax2diag2.img MicroVAX-II Diagnostics Disk 2
www.headcrashers.org/comp/rx50/uvax2diag3.img MicroVAX-II Diagnostics Disk 3
www.headcrashers.org/comp/rx50/uvax2diag4.img MicroVAX-II Diagnostics Disk 4

Those images are in logical sector format. When writing the logical sector images to a physical RX50 floppy the sector interleave and track to track skew needs to be applied. If you use the 'PUTR' program it might take care of that doing that. I usually use ImageDisk instead of PUTR. I wrote some code to transform the logical sector format images into physical sector format images and used BIN2IMD to convert those raw physical sector format images into ImageDisk .IMD images, then used IMD to write those images out to physical RX50 format floppy disk on a PC with a 5.25-inch 1.2MB floppy drive.

The ImageDisk .IMD images are too large to attach here. If you send me your email address in a private message I can email the images to you. They are less than 640KB in total.

You can download ImageDisk 1.18 from www.classiccmp.org/dunfield/img/index.htm

If you don't have a PC with a 5.25-inch 1.2MB floppy drive that you can boot into plain real mode DOS and some blank floppies I could probably create a set for you and mail them to you, although it would be better if you could create your own in case they get corrupted and you need to recreate a new set. That would also be useful when you get around to setting the system up as a PDP-11 and want to create floppy disks that can boot on the PDP-11.
 
Here is some sample output I captured booting "MicroVAX Maintenance System - Diagnostic Release 1.10" on an M7606 KA630 MicroVAX II. As far as I can tell this version does not support any CPU newer than an M7606 KA630.

Also, it might not support an M7516 DELQA, only an earlier M7504 DEQNA. I disabled the DEQNAA tests because of that.

I also disabled the RQDXA tests as one of the RX50 units I have seems to have issues. I could only boot from the second unit.

The tests are very slow on an M7606 KA630. They took several minutes to boot from an RX50. Long enough that I wasn't sure it was going to finish booting before it finally did. With the maximum 16MB of memory installed with two M7609 MS630 boards the memory exerciser test took about 30 minutes to complete.

Code:
KA630-A.V1.3

 1) Dansk       7) Nederlands
 2) Deutsch     8) Norsk
 3) English     9) Portugujs
 4) Espanul    10) Suomi
 5) Frangais   11) Svenska
 6) Italiano

(1..11): 3


Performing normal system tests.

  7..6..5..4..3..

Tests completed.


>>> BOOT DUA1

  2..1..0..


        VAXELN V2.0-00


 MicroVAX  Maintenance  System - Diagnostic Release 1.10

                  CONFIDENTIAL DIAGNOSTIC SOFTWARE
                           PROPERTY OF
                  DIGITAL EQUIPMENT CORPORATION

   Use Authorized Only Pursuant to a Valid Right-to-use License

 Copyright (c) 1986
 Digital Equipment Corporation

 The current date and time is: 17-NOV-1858 00:00:06.45


 Press the RETURN key to continue,
 or enter the new date and time; then press the RETURN key.

       [DD-MMM-YYYY HH:MM]: 28-APR-2018 14:15

 The current date and time is: 28-APR-2018 14:15:00.00


 The system is preparing for testing.

 This may take several minutes.
 Please wait ...


 Please remove the diskette.

 Insert the next diskette in the same drive
 and press the RETURN key.

 If you can not insert the next diskette,
 type 1 and press the RETURN key.

 >


 The system is preparing for testing.

 This may take several minutes.
 Please wait ...


 The system is ready for testing.


 Press the RETURN key to continue. >


 MAIN  MENU


      1 - Test the system


      2 - Display System Configuration and Devices


      3 - Display the Utilities Menu


      4 - Display the Service Menu


      5 - Exit MicroVAX Maintenance System


 Type the number; then press the RETURN key. >2

 SYSTEM CONFIGURATION AND DEVICES

 SYSTEM CONFIGURATION

      CPUA ... MicroVAX CPU
          KA630-AA 1MB, FPU MC=00 HW=00
      MEMA ... MicroVAX memory system
          16 megabytes. 32768 Pages.
                KA630 ... CPU module, disabled on-board memory.
                MS630-CA ... Quad height memory module, 8MB.
                MS630-CA ... Quad height memory module, 8MB.
      RQDXA ... Winchester/diskette controller.
          Revisions =4 and 1
                RX50 ... Drive is offline.
                RX50 ... Removable, Write protected
      DEQNAA ... Ethernet controller.
          08-00-2B-2D-B0-F8

 Press the RETURN key to return to the previous menu. >

 MAIN  MENU


      1 - Test the system


      2 - Display System Configuration and Devices


      3 - Display the Utilities Menu


      4 - Display the Service Menu


      5 - Exit MicroVAX Maintenance System


 Type the number; then press the RETURN key. >4

 SERVICE  MENU


      CAUTION: This menu is intended for use by qualified service
      personnel only.  Misuse of the commands could destroy data.


      1 - Set test and message parameters


      2 - Exercise system continuously


      3 - Display the device menu


      4 - Enter system commands


 Type the number; then press the RETURN key,
 or type 0 and press the RETURN key to return to the Main Menu. >4

 SERVICE  MENU
 ENTER SYSTEM COMMANDS


      CAUTION: You are entering the MicroVAX Diagnostic Monitor (MDM)
      via the command line processor.  There are no menus once you
      enter the monitor. Refer to the MDM User's Guide for detailed
      instructions.


      To return to the Main Menu from the MicroVAX Diagnostic Monitor
      type "RESTART" and press the RETURN key, or reboot the system.


 Press the RETURN key to enter the MicroVAX Diagnostic Monitor,
 or type 0 and press the RETURN key to return to the Service Menu. >

MDM>> HELP

 Current Commands Are:
      CONFIGURE              - Configure system
      SELECT Diag_Name       - Select diagnostic (all units) to run
      DISABLE Diag_Name      - Prevent a diagnostic from running
      ENABLE Diag_Name       - Allow a diagnostic to run
      SET DETAILED ON        - Display detailed messages
          DETAILED OFF       - DO NOT display detailed messages
          MODE VERIFY        - Set verify mode tests
               SERVICE       - Set service mode tests
          PROGRESS OFF       - Display no progress messages
          PROGRESS BRIEF     - Controller progress messages
          PROGRESS FULL      - Controller and test progress messages
          SECTION FUNCTIONAL - Set functional test section
                  UTILITY    - Set utility test section
                  EXERCISER  - Set exerciser test section
          TEST ALL           - Run all enabled tests
               xx            - Run only test number xx
          PASSES xx          - Run tests for xx passes
      START                  - Start selected tests running
      START ALL              - Start all enabled tests running
      SHOW CONFIGURATION     - Show system configuration information
      SHOW DEFAULT           - Show default settings
      SHOW DEVICE UTILITIES  - Show utility titles
      SHOW ERRORS            - Show reported errors
MDM>> SHOW CONFIGURATION

    1    CPUA  Enabled  KA630-AA 1MB, FPU MC=00 HW=00
    2    MEMA  Enabled  16 megabytes. 32768 Pages.
    3    RQDXA  Enabled  Revisions =4 and 1
    4    DEQNAA  Enabled  08-00-2B-2D-B0-F8
MDM>> DISABLE RQDXA

MDM>> DISABLE DEQNAA

MDM>> SHOW CONFIGURATION

    1    CPUA  Enabled  KA630-AA 1MB, FPU MC=00 HW=00
    2    MEMA  Enabled  16 megabytes. 32768 Pages.
    3    RQDXA  Disabled Revisions =4 and 1
    4    DEQNAA  Disabled 08-00-2B-2D-B0-F8
MDM>> SET DETAILED ON

MDM>> SET PROGRESS FULL

MDM>> SET SECTION FUNCTIONAL

MDM>> START ALL
CPUA started.
CPUA pass 1 test number 1 started.
CPUA pass 1 test number 2 started.
CPUA pass 1 test number 3 started.
CPUA passed.
MEMA started.
MEMA pass 1 test number 1 started.
MEMA passed.

MDM>> SET SECTION EXERCISER

MDM>> START ALL
CPUA started.
MEMA started.
 All enabled diagnostics were started.
CPUA pass 1 test number 1 started.
MEMA pass 1 test number 1 started.
CPUA pass 1 test number 2 started.
CPUA passed.
MEMA pass 1 test number 2 started.
MEMA passed.

MDM>> SET MODE SERVICE

MDM>> START ALL
CPUA started.
MEMA started.
 All enabled diagnostics were started.
CPUA pass 1 test number 1 started.
MEMA pass 1 test number 1 started.
CPUA pass 1 test number 2 started.
CPUA passed.
MEMA pass 1 test number 2 started.
MEMA passed.

MDM>> SHOW DEVICE UTILITIES

 DEQNAA  Ethernet controller.
      1 - The loopback utility.
      2 - The remote loopback utility.
      3 - The loopback server.

MDM>> SET SECTION UTILITY

MDM>> START ALL
CPUA started.
CPUA could not be tested due to invalid test selection.
MEMA started.
MEMA pass 1 test number 1 started.
Master bitmap shows following regions:
 good memory                at location between 00000000   and 00FFEBFF
 bitmap address             at location between 00FFEC00   and 00FFFBFF
 console area address       at location between 00FFFC00   and 00FFFFFF

MEMA pass 1 test number 2 started.
 This test destroys memory contents. Do you wish to proceed [n/y] ? Y

0.0 MB Stand-alone memory test started at 15:16:22
Press RESTART to stop test.
End of test pass 1, no errors detected Time 15:28:25
 
I'm currently working on getting a MicroVAX II to do a low-level format of an MFM drive. I have been trying to get the MicroVAX II to boot the above Maintenance Disk from a GoTek running flash floppy but I have had no success. @gslick you look to have a solid understanding of the Maintenance Disk images. Do you have any insight into the failure? I also do not have any other floppy images to try so I can't rule out an issue with the GoTek.

Thank you
 
I'm currently working on getting a MicroVAX II to do a low-level format of an MFM drive. I have been trying to get the MicroVAX II to boot the above Maintenance Disk from a GoTek running flash floppy but I have had no success.
I don't have a GoTek, only HxC. I did manage to make a real floppy to boot my Vaxstation it but took a number attempts with putr to find the correct flags to get a bootable disk. Since we don't have same hardware not sure what I can do to help.
 
www.headcrashers.org/comp/rx50/index.html
www.headcrashers.org/comp/rx50/uvax2diag1.img MicroVAX-II Diagnostics Disk 1
www.headcrashers.org/comp/rx50/uvax2diag2.img MicroVAX-II Diagnostics Disk 2
www.headcrashers.org/comp/rx50/uvax2diag3.img MicroVAX-II Diagnostics Disk 3
www.headcrashers.org/comp/rx50/uvax2diag4.img MicroVAX-II Diagnostics Disk 4

Those images are in logical sector format. When writing the logical sector images to a physical RX50 floppy the sector interleave and track to track skew needs to be applied.
The above images are in a format that will work with the SIMH Simulation however it will not work with a GoTek, I have not tested true discs, it will likely depend on the software you are writing with. However, someone has written the appropriate tool to do the required conversion for the images to be useable with a GoTek. See the related thread in the link below.

https://forum.vcfed.org/index.php?threads/rt-11-floppy-disks-conversion.1246505/post-1362587
 
www.headcrashers.org/comp/rx50/index.html
www.headcrashers.org/comp/rx50/uvax2diag1.img MicroVAX-II Diagnostics Disk 1
www.headcrashers.org/comp/rx50/uvax2diag2.img MicroVAX-II Diagnostics Disk 2
www.headcrashers.org/comp/rx50/uvax2diag3.img MicroVAX-II Diagnostics Disk 3
www.headcrashers.org/comp/rx50/uvax2diag4.img MicroVAX-II Diagnostics Disk 4

Those images are in logical sector format. When writing the logical sector images to a physical RX50 floppy the sector interleave and track to track skew needs to be applied. If you use the 'PUTR' program it might take care of that doing that. I usually use ImageDisk instead of PUTR. I wrote some code to transform the logical sector format images into physical sector format images and used BIN2IMD to convert those raw physical sector format images into ImageDisk .IMD images, then used IMD to write those images out to physical RX50 format floppy disk on a PC with a 5.25-inch 1.2MB floppy drive.

The ImageDisk .IMD images are too large to attach here. If you send me your email address in a private message I can email the images to you. They are less than 640KB in total.

You can download ImageDisk 1.18 from www.classiccmp.org/dunfield/img/index.htm

The attachment file size limit is larger now than it was 4 years ago. Attached are the ImageDisk .IMD images I created from the uvax2diag1.img MicroVAX-II Diagnostics Disk 1 through the uvax2diag4.img MicroVAX-II Diagnostics Disk 4 disk images 4 years ago. If you have a PC with a 5.25-inch floppy drive that you can boot into real mode DOS, you could use ImageDisk to write these .IMD images out to physical 5.25-inch floppy disks in RX50 format.
 

Attachments

  • MDM-DIAG.zip
    617.6 KB · Views: 3
Back
Top