• Please review our updated Terms and Rules here

Losing my mind with capacitive keyboard repair

VERAULT

Veteran Member
Joined
Jan 30, 2012
Messages
8,447
Location
Connecticut, USA
I have been working on my Compaq portable II's capacitive keyboard restoration for 10 months! Im at wits end. I have the right foam, the issue is the capacitive surface/foil. Someone spilled coke on one half the keyboard. IT literally corroded the plastic foil discs down to just clear plastic disks. I have tried Mylar balloons, anti-static bags, foil ( foil definitely does not work!) all to no avail, have about 10-12 keys that I just cannot get working!


Surely im not the only one with this problem, what have you guys done to fix these foam capacities keyboards!

Please help, I have more important things to waste time on than this stupid keyboard!!!!
 
If you want to punch out foil pads quickly, you could make a 3D printed punch and just use roll foil to make some of those fancy shaped pads. Probably could do the same for the foam.
 
I'm not sure whether or not it will work for your case, but I have in the past repaired dissolved tracks from a keyboard membrane by using a conductive ink pen.
 
plain foil (reynolds wrap) does not work. IT prints half a dozen characters on the screen as soon as you touch the pads, Not enough resistance maybe?
 
I'm not sure whether or not it will work for your case, but I have in the past repaired dissolved tracks from a keyboard membrane by using a conductive ink pen.

the tracks are fine and clean, the keyboard pcb is not the problem. The capacitive stickers are what disolved down to plastic. I wish I could show a photo of them, but I threw them all out, they were gross. The keyboard pcb works great. IF I take a working capacitive sticker I can press every key on the keyboard.
 
3D printed punch? Wouldn't a gasket punch be better in every way?

I bought a 1cm punch, the problem is what material to use for capacitance...

could you recommend a gasket punch with a 1cm to 1.1cm punch radius?
 
Last edited:
I bought some from a person on eBay, most worked well, but a few didn't and they sent me replacements to get everything working. These things are sensitive!

When I was messing around with non static bags, one side worked better than the other for sure.
 
You want the conductive side of the antistatic bag toward the foam disc, away from the keyboard PCB, you're trying to make a small capacitor between the traces on the keyboard PCB, which means that the substance which touches the keyboard traces needs to be an insulator, with a conductor sandwiched on the other side. It's also worth noting that you won't get good results (perhaps no results at all) with antistatic material that isn't actually conductive -- some materials are merely non-static-generating, while others are static dissipative, meaning they're slightly conductive and will actually bleed off a charge. This is further complicated as there are static dissipative materials that are multilayer so that they don't short out and drain things stored inside that are *supposed* to have a charge, like circuit boards with batteries.

If you've still got the antistatic bag from your XT-IDE, that should work.

I might still have it, have to check. Did it have a sticker on it with any label?

Also going back to what you say, should I be using the inside or outside of the bag against the pads on the pcb?
 
I bought some from a person on eBay, most worked well, but a few didn't and they sent me replacements to get everything working. These things are sensitive!

When I was messing around with non static bags, one side worked better than the other for sure.

I guess it would help to know which side is better. When I use the pad on the bare pcb both sides seem to work, when I reassemble, not so much.
 
Plain foil won't work because it shorts out the pads (infinite capacitance). You need to cover the foil with something non-conductive, like a piece of tape.

If you use mylar, make sure the conductive side is facing away from the PCB, and the insulating side contacts the pads. You can check with a multimeter, or just put a piece on the end of a q-tip and see which side works.

When you press the key, it forms two series connected capacitors (= 1 net capacitor) in series with the pads:


Code:
                     FOAM FOR MECHANICS
                   -----------------------     <conductive material    ===      | |    | |     ===      | |
                   =======================     <-insulator             ===   ---| |----| |---  ===   ---| |---
(PCB foil) <--------------          --------------> (PCB foil)                  | |    | |              | |
                      Pad1          Pad2                                         C      C               C/2
 
Last edited:
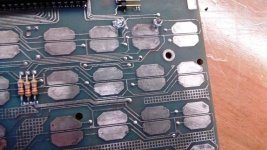
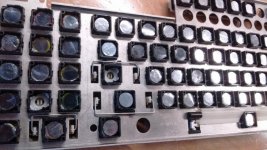
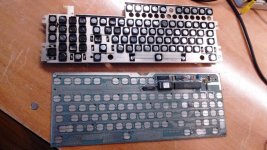
Thought id add some photos too: IMG_20180302_115118640.jpgIMG_20180302_115126541.jpgIMG_20180302_115056890.jpg


Your right, ill check with a multimeter. Am I checking for continuity or resistance for the correct side?
 
Last edited:
Continuity (or a low resistance). If your DMM has a continuity checker, that should be fine. If neither side registers with the continuity checker, use the lowest resistance range. One side should read open circuit or over range, and the other should be a low resistance.
 
I bought a 1cm punch, the problem is what material to use for capacitance...

could you recommend a gasket punch with a 1cm to 1.1cm punch radius?

Radius? I'd use a common ⅞" punch for that. Though I think you mean diameter, in which case 7/16" should work. I don't quite follow though, this sounds far to big for what I think you're doing. Very likely I'm misunderstanding.

Most auto parts stores carry a cheap set of punches that range from ⅛" to ⅝" or so. I'd like to say you can get one for around $10 that will serve the purpose. If you invest a few more dollars for a proper pad to punch over, you'll have better results than punching over wood or metal. (You may already know this.)
 
Back
Top