• Please review our updated Terms and Rules here

Broken CRT mounts, how might I fix this?

SomeGuy

Veteran Member
Joined
Jan 2, 2013
Messages
4,440
Location
Marietta, GA
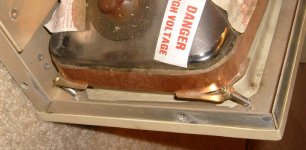
broken CRT mounts.jpg

Ok, so how might I fix or work around this?

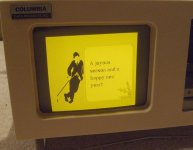
On a whim I grabbed this "luggable" CDP VP machine off of eBeh. When I paid for it, I alerted the seller it would need a good amount of foam to protect it. But what did he do? He just WRAPPED it in scrap cardboard because apparently the entire purpose of packing something is to make it look brown! Surprisingly the CRT didn't shatter and seemed to more or less work. (Some issue with the vertical deflection, there is a damaged component on the analog board that I suspect got squished during shipping when things went flying around inside, but I should be able to fix that).

I don't believe I could put any kind of screw in there, because I would have to remove the front "bezel", which turns out to be just a very, very, thin and fragile plastic sheet that is just glued to the front of the aluminum case.

Any ideas?
 
Without removing the bezel, your choices are limited. Are the standoffs embedded in a metal faceplate? If so, I'd try a good strong epoxy. Adding some support material under the CRT might take some of the strain off the standoffs.
 
Use JB weld. Use the slow setting, not the quick setting. You may need to grind the ends of the mounts to get them through the ripped metal. Wipe all the surfaces with a paper towel wetted with BrakeClean, to remove any oils. The metal mush be really clean.
Dwight
 
If you really cant separate the plastic from the metal then you are limited to gluing and maybe supporting the bottom of the tube with some packing. We use Belzona at work and I have had lots of success with it,

My favourite would be to strip it, deform the ends and hammer them back in, or braze it if compatible but I take it you believe the plastic would shatter if you try to pry it from the frame ?
 
Well, held in for the moment by the one remaining standoff mount that isn't ripped off, and a number of minor glitches, but it works.
it works.jpg

Yea, the plastic "bezel", is all thin plastic, kind of like what a disposable plastic tray might be made out of. It looks like it is hot glued to the aluminum behind it. Looking closely, there are already some tiny cracks.

That explains why I have seen lots of variation in the bezel appearance across a number of 1600VPs that have been on eBay. Probably not too hard to change designs on something like that.

I'll check out that JB weld, and something to cushion under the CRT too might not hurt.

I was sort of imagining perhaps some kind of wide flat base to mount a slightly shorter replacement standoff that could be glued to the aluminum inside.
 
That particular type of stand off that is pressed into a flat panel is designed so that on the reverse side of the panel, it does not sit proud of the surface. This is why they could glue the flat plastic panel to the surface.

Of course this methodology reduces the strength , which is why they broke free when it was decelerated. But, going in your favour is that a good amount of the gravitational potential energy that got converted to kinetic energy as it fell through the gravity field, was dissipated in tearing these mounts off, rather than destroying the CRT.

Options for repair are exactly as Dwight says, if you do not want any cosmetic damage to the front plastic panel.

On the other hand, another option is to fit new spacers and screws. If you could get the plastic panel off unscathed then countersunk screws and new spacer (or the originals machined down a little and tapped through) would give the best result for strength and allow re-fitting of the plastic panel. I'd avoid solvents with the plastic but the glue might break down or soften with hot water as a possible option.
 
You could also try to drive in a swage nut, but I'm not sure how the plastic would hold up under the stress.

Lots of options; but the good ones involve taking off the bezel.
 
There is another option. The front panel is bent around at 90 degrees to create the flanges that project perpendicularly from the perimeter of the metal panel. Do you could make a metal insert that fits inside that and is screwed with CS screws to the flanges and maybe 1/2 inch wide. You could fit new CS screw spacers to that, think of it like a small rear sub panel. As well as screwing it to the flanges, where it abuts the panel where the original spacers were torn out, you could glue that with JB weld. That would give a solid result.

The added metal could take the form of a triangular shape, with flanges, that sits inside the corners of the main panel, and is screwed with two CS screws to the flanges, that would be super strong and require no glue and no removal of the front plastic panel.
 
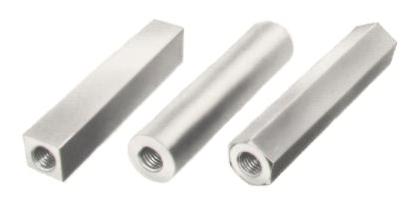
I deal with this issue constantly at work where equipment arrives with feet ripped out of the bottom of the device. Our solution is to replace the mount stud with a standoff threaded on both ends and using a screw to reattach it to the frame.

threaded-spacers-1516094568-3583788.jpg

They can be hacksawed to size relatively easily. A countersunk screw or a pan head with a washer will typically solidly secure you to the old hole without causing clearance issues.
 
JB Plasticweld would probably be better than jbweld for this instance. I have used it for similar purposes, and its much more of a firm putty consistency.
 
I deal with this issue constantly at work where equipment arrives with feet ripped out of the bottom of the device. Our solution is to replace the mount stud with a standoff threaded on both ends and using a screw to reattach it to the frame.

threaded-spacers-1516094568-3583788.jpg

They can be hacksawed to size relatively easily. A countersunk screw or a pan head with a washer will typically solidly secure you to the old hole without causing clearance issues.

This would require removing the fragile plastic bezel. That is what is trying to be avoided.
Dwight
 
Now that I"m looking at the picture, I'd definitely recommend jb plasticweld for this. I think regular jbweld might crack too easily and flow too easily into areas you don't want.

https://www.amazon.com/J-B-Weld-8237-PlasticWeld-Plastic/dp/B003S2E4UE

There's a number of variations on this; plasticweld, waterweld, other similary products named kwikweld and whatnot. Don't get two-part syringe version, you want the hand-mix putty version that had an inner and outer layer and comes in a plastic tube as a single block of putty. You can also look at "steelweld" but it's not quite as easy to work with.

It's a fast-curing hand-mix putty, and can be pretty easily removed from (most) surfaces if you really need to, and can be shaped/cut/trimmed easily while uncured and sanded/filed into shape once cured. Use a small piece as a test somewhere on the metal frame, to verify it sticks well.

Easiest fix would be to use a good amount and simply cement the (straightened) studs into place. I have used it to replace studs like this before, and I make a cone of the material around it with a reasonably large base, and it works great.

If it was me, I'd probably also use a few moderate sized blobs of plasticweld to form a supporting structure under the tube, to avoid any more damage like that from accidental jarring or dropping. Pull tube out, place the plasticweld along what would be the normally bottom edge of the tube, and push the tube into position against the plasticweld which should mold the plasticweld to the shape of the tube perfectly. Use a piece of saranwrap, parchment paper, or aluminum foil along the bottom edge of the monitor temporarily to avoid gluing it into place permanently.

I'd wear protective gloves though, some people have allergic reactions to the epoxy in jb plasticweld.

Plasticweld also works well to fill in cracks and broken case parts. It won't match the color but can be reasonably attractive for filling insupporting broken corners and whatnot.
 
Last edited:
Still would use Belzona 1111, though its a bit pricey, Used Devcon as well with sucess.

We have filled and machined cracks in industrial pump casings with Belzona, its strong stuff.
 
Back
Top