• Please review our updated Terms and Rules here

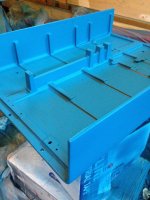
PT Helios II cosmetic restoration is coming along....

Corey986

Administrator
Joined
Dec 7, 2011
Messages
821
Location
East Coast USA
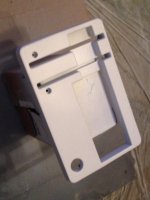
Well I finished the chassis repaint and repair. I actually had the whole thing done, but I wasn't happy with the front panel, it was in bad shape before the restore with gouges and scratches some of which even spot repaired wasn't looking good in primer, so I chemically stripped it down to the bare aluminum and special epoxy made for aluminum repair skim coated all the areas of concern, shaped and then resprayed it back in original white primer. We are expecting some rain on the east coast so I may not be able to do a final sand on the primer and spray into black with splatter coat till next week.

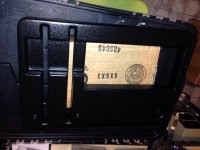
I also replaced the broken connectors on the controller cards. I found an exact match back in May at Excess Solutions in Milpitas, that place is amazing. The match is perfect that I only changed the one on each card.

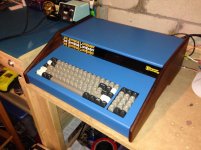
Anyway... here are some pics in progress, and also a pic of the resprayed Sol-20. Figured since I had the gun out anyway and I bought a nice new on the air regulator for my HVLP sprayer to make doing the splatter coat easier, when I did the Apple II last time I wasted a lot of paint and cardboard getting the pattern right each time I did a layer of splatter....

after the paint hardens up a bit, I'll wax everything to protect it. I decided not to use two part paint because of cleanup...
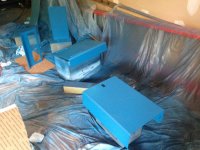
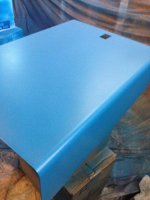
IMG_0155.jpgIMG_0171.jpgIMG_0172.jpgIMG_0210.jpgIMG_0209.jpg

Cheers,
Corey
 
Last edited:
Great work so far! I'd like to learn more about the "splatter" coat. Is that a special nozzle on the spray gun? Special paint? Just a technique? I haven't even considered painting anything because of that splatter finish. I do have to paint a NeXT Cube but it doesn't have a splatter coat. I have a Commodore 4040 drive who's paint is coming off as I clean it so that might be a good candidate.
 
Splatter coat has to do with constant low pressure. You turn down the air to the gun till it splatters on top of the painted surface. You do have to make sure you are thinned just right and use a good quality paint. I test the pattern on cardboard, lots and lots of cardboard and adjusting till the pattern matches the original. I take pictures of the original or have a sample near by for comparison.

Each MFR has a different pattern.

PT for example on the SOL-20 is a tight small pattern done in one direction then another while the piece is on the side. The Helios is a larger splatter pattern done in two steps one large and one small. The small and large merge to make a weird kind of spatter.

Apple the splatter coat depends on the vintage. The earlier the II, the bigger the spatter size, but still done in two phase like the Helios.

IBM PCs are the easiest. It seems they are very similar to a car trunk. I have had some success using trunk splatter, waiting a week to cure and overcoating...

Cheers,
Corey
 
Is that the original Sol-20 paper badge?
I have the original one, but this is a modified version of the one from your website. The size didn't match the original so I had to tweak it. Then I had it printed up on a die sublimation printer on magazine paper like the original. I guess I could have used an industrial inkjet, but this is indistinguishable from the original except it isn't faded.

Cheers,
Corey
 
Last edited:
Actually I had no idea if it was original or not. It just looked really clean.
After drawing the artwork, I never actually printed it....glad it works...looks great with your new paint job

Phil
 
I have the original one, but this is a modified version of the one from your website. The size didn't match the original so I had to tweak it.

Corey, can you provide that file somewhere? I might need a copy and it's good to get it while it's readily available. I have another Sol-20 with a different name badge coming (I hope). Not sure if I want to change it but it's an option I'd like.

Oddly enough, one of the manuals that's coming with that acquisition is an original PTDOS manual. There's no Helios II there though. It's not acquired from the original owner so I'm not sure why it's there. Unfortunately, the systems will come with no diskettes. I'll save the details of this acquisition for another thread IF it arrives. Apparently, UPS lost it yesterday. The package is marked "Delivered"... but not to me :(
 
It's not surprising that there is a PTDOS manual and no drive. By now every Helios II system either has had it's drives replaced with non-Persci or they have been completely rebuilt or thrown away. Also if the drives are shipped wrong or dropped they are destroyed as they have a glass voice coil setup and an incandescent lamp that should have failed by now. They are also very very sensitive to alignment.

There is only one person I'm aware of who knows how to replace or repack every bearing and has had a limited amount replacement parts including gears recreated, the number of working units I know of can be counted on a little more than 1 hand. He completely rebuilt my drive set.

As for the Logo strip, I'll send it to Nama later and he can host it since they are based on his work. BTW: the earlier units had the P swirl and the later units had just processor technology.

Cheers,
Corey
 
Thanks guys. I grabbed a copy. This is timely for me because I just acquired another Sol-20 (purely by luck) with a custom name plate. Not sure if I'll keep it or replace it.
 
Started to reassemble the drive, supply and case. No front panel yet...

You can see in the attached pics the single Persci drive with two disk slots. It shares a common motor, but has a head for each drive. This is one thing that makes the Helios really cool to watch when doing a disk copy with the cover off.

Also attached is a picture of one of the controller cards. Can you tell which cable connector on the card isn't original. The replacement I found was exact...

Cheers,
Corey
 

Attachments

  • image.jpg
    image.jpg
    95 KB · Views: 1
  • image.jpg
    image.jpg
    96.3 KB · Views: 1
  • image.jpg
    image.jpg
    93.7 KB · Views: 1
Front panel painted and splattered. Now need to wait a few days to harden up so I can buff it out and reassemble the whole thing.

image.jpg
 
I would like at some point to make a video of it, but a video of spray painting isn't so easy. First I don't want to ruin the camera because of any paint mist in the air. Second, to do it right I'd need a cameraman as I don't hang the piece as would have been done in the factory or in a paint shop, it put it on a card board box and move around the piece. It's more about not wanting to paint my walls and just wanting to paint the piece. Makes it a bit harder to do because you need to keep the angle of the gun much more consistent. The camera man would need a paint mask. I only have one and they are about $25-50 dollars. I don't use a cheap mask, but one made for spraying with an HVLP gun.

On a good note: my $26 on sale at harbor freight HVLP touchup gun works much better to do a splatter coat than my big gun... With the big gun I need to do two coats of different sizes to get the effect, with the small gun I can adjust the air pressure a bit easier with my finger as I go around.

Cheers,
Corey
 
Corey,

I'm interested in reproducing the paper badge as well. Did you print this yourself, or did you have a service print it?

Dave
 
For the paper logo, I had the professionally reproduced on magazine paper so it matches perfectly.

For the paint, I had it custom mixed to match. It is specifically made for painting metal. If I recall I tried to find a Pantone that matched and it wasn’t perfect enough. I may still have the can for the brand and type. The paint wasn’t cheap.
 
Back
Top