• Please review our updated Terms and Rules here

Sol-20: Side replacements

dfnr2

Experienced Member
Joined
Dec 6, 2011
Messages
466
Location
Dallas, TX
I while back the shelf holding my Sol-20 failed, and the Sol fell 8 feet onto the floor, bouncing off the bench. The machine survived, but the sides were dented and scratched beyond reasonable refurbishment. A forum member kindly offered a set of original sides for a very reasonable price, but I decided to try to recreate them from scratch, with much help from an artist friend who was a furniture maker in a previous life.

I picked up a nice piece of walnut a bit over 1" thick from a local woodworking shop, and after letting it acclimate, re-sawed it into 2 planks a bit over 1/2" thick, which were prepped using the jointer and planer (with lots of help) to produce a matched bookend pair of flat, smooth 1/2" boards for the sides.

Initially, we tried photographing a panel, then correcting the lens distortion, and measuring the holes in the image, transferring the measurements to a 2-D model (in vCarve). Unfortunately, that resulted in incorrect hole placement. So, I created a jig to measure X and Y coordinates using T squares and rulers, and measured the outlines and all the hole positions, correcting the measurements in the 2D design file.

That left me with designs to CNC the walnut outer portion and the masoninte inner portion of the panels. I had a chance to do a little work on them today. I've attached some photos showing

1) In process of routing the edges of the walnut. I used a 1/4" roundoff bit, which I think is a smaller radius than the original, which had slightly pointier curves along the edges, but this gives a nice round edge to the 1/2" walnut, which I think looks better.

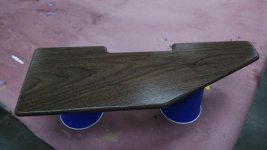
2) The routed, unsanded walnut. There's some difference in grain due to the thickness of the boards, but you can see the matched grain patterns of the two pieces cut from a thicker board.

3) In process of sanding the walnut

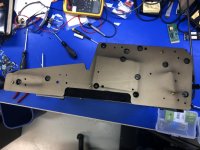
4) The inner piece of the panel placed next to an original side for comparison. The hole pattern is the same on both sides, even though the right and left sides have the anchors in different positions. The original was made from masonite, but I've CNC'd these from scrap 1/4" plywood. You can see some places where my technique with the flush router around the edges was not optimal.

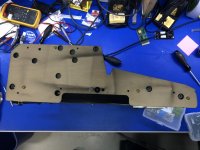
5) The inner panel compared sitting on top of the original for comparison.

I'll post the finished panels once they are done, and will post the design files when I've verified that the finished panels fit the case.

Dave
 

Attachments

  • routing.jpg
    routing.jpg
    91.9 KB · Views: 1
  • routed-unsanded.jpg
    routed-unsanded.jpg
    93.6 KB · Views: 1
  • sanding.jpg
    sanding.jpg
    95.1 KB · Views: 1
  • inner.jpg
    inner.jpg
    79.3 KB · Views: 1
  • inner-compare.jpg
    inner-compare.jpg
    77.8 KB · Views: 1
Last edited:
Outstanding work ! I really admire what you have done there and dealing with the disappointment after what happened to your Sol. Very impressed.
 
Looks great, are you planning on using Masonite like the originals for the inner piece? Also where are you getting the fasteners? Are you reusing the old ones?
 
Looks great, are you planning on using Masonite like the originals for the inner piece? Also where are you getting the fasteners? Are you reusing the old ones?

Thanks. I opted to use 1/4" plywood because I found a piece big enough to use, but there's no reason why it could not have been masonite. I can't see any real advantage for one over the other.

The original threaded inserts are plastic, and on one side have stripped, broken, or pulled out, so reuse would not be an option. Also, even though the originals are banged up, I prefer not to cannibalize them. The bolts that hold on the sides have an 8-32 thread. I found some screw-in brass inserts at Ace Hardware with the right inner thread size, and then I adjusted the hole size to accommodate them.

I got started on finishing the sides today. The local Makerspace prohibits aerosols, so I am using a matte water-based polyacrylate finish. Unfortunately, none of the water based dyes or stains looked quite right, and the wood, when wetted, had a really rich color, so I opted to apply the finish directly without staining. It turns out that it darkened the wood a little bit, but not as much as I hoped, so the panels will not be quite as dark as the originals.
 
Last edited:
This is with 11 coats of General Finishes water soluble high performance topcoat (satin), with sanding between coats as needed. No stain.

topcoat.jpg
 
Last edited:
I've been looking into masonite, which is a brand name for a type of hardboard. It is harder and stronger than MDF, but still will tends to swell and deteriorates with age. A decent plywood is stronger and less likely to swell or deteriorate, and will hold threaded inserts more securely, so I've decided to keep the plywood inner portion instead of trying to replicate the original masonite materials.
 
Man I need to learn how to do this for my Sol prototype replica. I don't have a CNC though. I'm hoping it'll be a little simpler because it doesn't have as many curves.. but don't know where to get the walnut.

Great job!
 
Thanks!

Woodworking shops will often stock unfinished, raw boards of various types, including walnut. Getting fully prepared boards will be more difficult, but I think those same shops might be able to prepare the boards to your specifications.

It's nice to have at least a planer, and you'll also want a hand router with flush cut bit and a roundover bit. You don't really need a CNC, but it helps. If you print out the design files, you can cut a template with a bandsaw and shape it to you satisfaction, then clamp it to your walnut and use a hand router to match the shape. I'm very lucky to have access to a really great Makerspace that has all that stuff, plus people who know how to use it and can teach neophytes.

One thing I'm learning is that working with wood isn't cheap or quick, but I believe the results are worth the investment.

I confess I could not have done this without lots of guidance. And, my friend applied the finish for me, which might be the most crucial step.

If you're interested in having some panels made and you have drawings and measurements, PM me and I can put you in touch with my friend.

Dave
 
Testing the sides for fit:

Photo Oct 04, 3 52 46 PM.jpg Photo Oct 04, 3 57 51 PM.jpg

There's some parallax due to the camera, but the fit is nearly perfect.
 
Almost done.

Almost done.

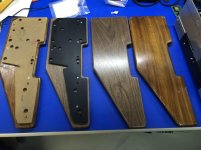
Almost done. Here are the replacement panels next to the originals (new panels in the center):

Photo Oct 03, 5 58 05 PM.jpg

I just need to install the threaded inserts.

threaded-insert.jpg

I tried to use a screwdriver to install the inserts, with subpar results. Then I found this video, which shows a much better method. Despite the claim in the video that the slot is for cuttiing wood, further research suggests that the slot is actually for a custom installer tool for use with a drill press.

Anyway, I've ordered some more inserts, going up a size to 10-32, and hopefully will have time to finish this up in the next week or two.

Dave
 
I installed the threaded inserts today. Unfortunately, I installed the upper insert for the right panel in the wrong position, so I have to take it back to the Makerspace (to use the drill press) and re-install it.

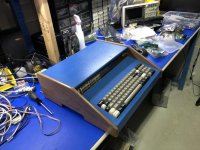
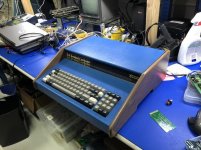
However, I tried out the sides on the case using the other screws, and everything fits nicely. I am pleased with the appearance. I prefer the more natural walnut color, compared with the originals which were stained a reddish hue that I felt detracted from the walnut. Here are some shots with the case partially re-assembled:

oblique.jpg right_oblique.jpg


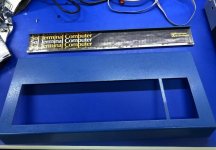
One thing I noticed is that the keyboard and top don't seem to fit together snugly. The manual describes a keyboard cover and a top cover, but I have three pieces: A keyboard cover, a middle vertical piece with the SOL logo, and the top cover. The top cover hooks over the vertical middle piece, but there's no real attachment between the keyboard cover and the middle piece. I'm beginning to suspect that the middle piece and keyboard cover should be one spot-welded piece that broke apart in the fall. I can't find a picture in the manual, though. Can anyone confirm? You can see the small dent in the top cover in the pictures above.

keyboard_cover.jpg

Dave
 
Last edited:
I installed the threaded inserts today. Unfortunately, I installed the upper insert for the right panel in the wrong position, so I have to take it back to the Makerspace (to use the drill press) and re-install it.

However, I tried out the sides on the case using the other screws, and everything fits nicely. I am pleased with the appearance. I prefer the more natural walnut color, compared with the originals which were stained a reddish hue that I felt detracted from the walnut. Here are some shots with the case partially re-assembled:

View attachment 56636 View attachment 56637


One thing I noticed is that the keyboard and top don't seem to fit together snugly. The manual describes a keyboard cover and a top cover, but I have three pieces: A keyboard cover, a middle vertical piece with the SOL logo, and the top cover. The top cover hooks over the vertical middle piece, but there's no real attachment between the keyboard cover and the middle piece. I'm beginning to suspect that the middle piece and keyboard cover should be one spot-welded piece that broke apart in the fall. I can't find a picture in the manual, though. Can anyone confirm? You can see the small dent in the top cover in the pictures above.

View attachment 56639

Dave

The two pieces you refer to are stuck (presumably spot welded ) together on my SOL.
 
The two pieces you refer to are stuck (presumably spot welded ) together on my SOL.

Ah, yes, I can see the spot weld marks. But since the parts are painted, spot welding them back together is not an option, even if I had a spot-welder. I think the best bet is to epoxy them together with JB-weld. It's not a high-stress joint, and should hold up.
 
Last edited:
Back
Top