• Please review our updated Terms and Rules here

Altair 8800 restoration project started

ika

Member
Joined
Jul 21, 2020
Messages
10
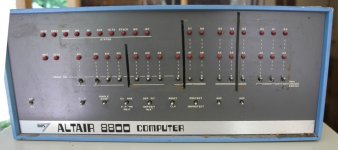
I recently acquired an Altair 8800 from a fellow Ham. This was a unit that was in actual business use 40+ years ago, and had been updated to be able to run perhaps CP/M or the Cromix Operating System.

The system has just 3 cards in it, the ZPU board (Z80) from Cromemco, the 64KZ Dynamic RAM board also from Cromemco and the Cromemco 4FDC floppy disk controller (which also provides the rs232 terminal port & RDOS in ROM). There is a separate enclosure with 2 8” floppy drives in it, which will be the next restoration project.

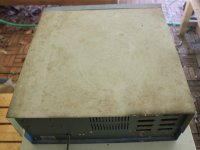
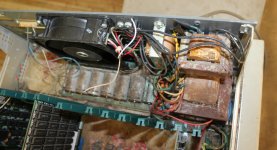
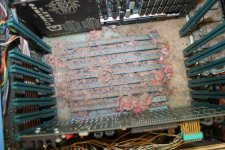
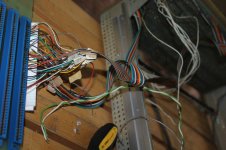
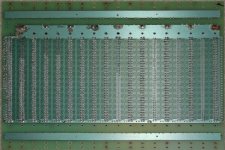
Luckily it had been stored away and had avoided getting recycled or thrown away! Unfortunately during storage it was subjected to rodent nesting for some time. Below are some photos of the starting point of my restoration project. The view down into the back plane board is taken after I grabbed a huge ball of mouse mess that filled the entire free space between the cards.

My thinking is to restore it to the state where it was when it was last in use and perform some testing with the front panel to verify basic functioning of the system. The next step would be to select boot into the RDOS monitor and have some fun operating the Altair using a terminal emulator in my PC. The RDOS monitor is very focused on Disk operations, which will come in handy after I restore the diskette drives. To begin with, it will be fun to see if RDOS will allow me to upload things like Altair games or Altair basic into memory and execute them.

The first step will be to dismantle the Altair to the point that it is possible to get rid of the rodent mess. The cards & front panel look to be in pretty good shape and will only need a thorough cleaning. Is washing with dish soap recommended? If so, should all IC’s be pulled?

The back plane (motherboard) and power supply look very iffy. There is a lot of corrosion in the card edge connectors of the back plane. I will probably have to unsolder all the power supply wires & front panel wires from the back plane (ugh!), treat the connectors with a contact cleaner & do a really thorough clean with dish soap & water, followed by isopropyl alcohol rinse & drying.

What contact cleaner is recommended for such a task?

The power supply will have to be cleaned and recapped. One of the transformers has some damage from the rodents but I am hoping it is limited to just the top insulation layer. If all else fails, there’s always the option of installing modern switch mode supplies.

Any comments or advice guys? This is my first vintage computer restoration project - wish me luck!

-ilkka
front_s.jpg
top_s.jpg
psu_s.jpg
mousemess_s.jpg
backplane_s.jpg
 
First day

First day

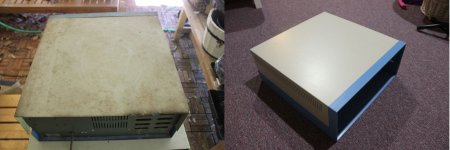
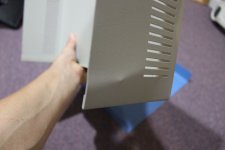
The first steps have started. I have partially dismantled the system and removed all of the rodent debris. I did the work outside and used a half-mask respirator & gloves to protect myself. What a sweaty and nasty job! The cards are waiting in anti-static bags for their turn, and so far I have cleaned the top and bottom shells of the case.
shell_before_and_after_S.JPG

I have to say I was surprised how clean the case shells came out. I used just dish soap with water, a relatively soft dish brush and a cotton rag. I washed the shells 3 times each. The top shell was still stained and splotchy so I used a paper towel with a bit of isopropyl alcohol followed with mr. clean magic eraser & lots of elbow grease. I was careful to not damage the paint/powder coating.

The shells had paint damage and buckling in a couple of locations from being pushed against bolt heads. I am planning to use a vise to attempt to straighten out the buckling, taking care of course to protect the surface finish from the vise.
shell_bent_S.jpg

-ilkka
 
In regard to the backplane edge connectors - after removing the backplane from the chassis, I would use IPA and an old toothbrush to clean the whole board and connectors. After that you might find the removing and reinserting an S100 card a few times will clean up and improve the connections. If badly corroded, a fibre glass 'pen' can help further remove corrosion.
 
I have an OSI C2-4P that had similar rodent damage that actually cleaned up better than I would have expected. I do have doubts that those connectors will be reliable.

I have reproductions of the 4 slot backplane that Altair used, and can help you out with the Sullin edge connectors that Altair used. Although it would be very time consuming you could remove and replace the edge connectors on your board. The S100 group also has a very nice 9 slot reproduction backplane.

Klyball designed a replacement/reproduction of the Altair power supply board and I did a small run. I still have a few spares in case your power supply board is beyond repair.

The Cromemco boards weren't original to the Altair. While I can provide a bare reproduction of the CPU board personally I'd consider Josh Bensadon's replacement "all-in-one" board as a better option. It will connect to the front panel and provide a single board way to get up and running. With Josh's board you'd really only need one functional S-100 slot to get a basic system up and running CP/M.

Some Link's to get you started:

http://s100computers.com/My%20System%20Pages/8080%20CPU%20Board/8080%20CPU%20Board.htm

http://www.the-planet.org
 
After Day 2

After Day 2

Thanks for your help guys! I have to apologize if it seems I’m ignoring your input. As a new forum member, my posts are quarantined for an unspecified amount of time. I already posted an update for the 1st day of restoration results before I saw your posts. (FWIW, even though this is a bit frustrating to me at this point, I agree with the policy – keep spammers away!). This extra delay will go away after my first 10 posts.

The IPA , tooth brush & fiberglass pen sounds like a good idea. I have not looked under the board yet to see if traces are corroded. I’m keeping my fingers crossed. BTW when I see IPA I think of India Pale Ale – now I’m thirsty!

Gary, I am very excited to hear that you have some of the Sullin edge connectors! And backplane boards! There are 3 or 4 unpopulated positions on my backplane, If I can’t get the existing ones working reliably (and if the traces aren’t badly corroded) I should be able to solder those in and get a few good working connectors on the old backplane! I would really prefer to keep the original backplane board in this system. Can you PM me with details on how to get the Sullin edge connectors?

Josh’s board look awesome! I will keep that as my fallback plan. If I cannot get those diskette drives working that SD card would come in handy. I assume it would be possible to boot e.g. CP/M from the SD card. I should probably just order Josh’s card if he has any left. Even when the drives work, the SD card would make it much easier to create software & boot diskettes.

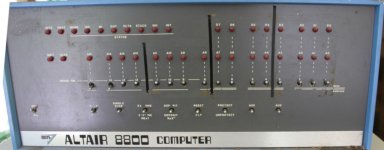
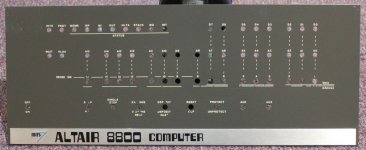
In the meanwhile, I made progress on cleaning the front panel. The panel had some kind of old dried-up tape on it to group the switches and lights into hexadecimal rather than octal arrangement. I can sure understand why they did it, but those tapes had to go along with their crusty adhesive residue! I tried IPA in one spot but that was a baaad choice! The IPA started to eat away the paint. Luckily I was aware of the possibility and backed off immediately before visible damage occurred. Gentle scraping & magic eraser did the trick! Here are before and after pictures. The white silkscreen had worn off in a couple of spots. Nothing to do about that I guess.
frontpanel_before_S.jpgfrontpanel_after_S.jpg

-ilkka
 
Gary, I am very excited to hear that you have some of the Sullin edge connectors! And backplane boards! There are 3 or 4 unpopulated positions on my backplane, If I can’t get the existing ones working reliably (and if the traces aren’t badly corroded) I should be able to solder those in and get a few good working connectors on the old backplane! I would really prefer to keep the original backplane board in this system. Can you PM me with details on how to get the Sullin edge connectors?

Look at http://www.the-planet.org

- Gary
 
OK guys,
I had a bit of a hiatus with this project due to the first half of my summer holidays, but I'm back now!

> Look at http://www.the-planet.org
Thanks Gary, those look really nice! This is an excellent option if my backplane turns out to be unsalvageable!

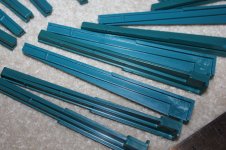
I took the backplane off the chassis, carefully removed the rusty screws holding the card rails onto the PCB. I cracked one but I think it was already cracked as some of the screws were definitely not the right ones! I'll have to order all new screws to put this back together. I washed the card rails with dish soap a couple of times and they look like new to me :)
card_rails.jpg

My next dilemma is the front panel wiring. It looks like the original wiring was replaced with ribbon cable wiring at some point in this units life. I'm sure this wire is better that the original white el cheapo wire that MITS used. But the insulation has hardened significantly and may be too brittle to be left in use. I am considering replacing the ribbon cable wiring with all new white wire to return it to a more original look. Opinions, anyone? Anyone in the US market know a source for good quality stranded white wire I should use? What wire gauge? I would not mind reaming the PCB holes a bit larger if necessary for proper size wire.
front_panel_wires.jpg

-ilkka
 
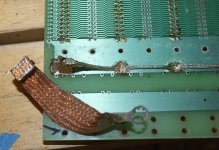
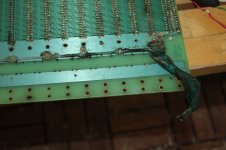
Got the front panel wiring de-soldered & the whole backplane is now free for cleaning. First I wanted to remove the heavy gauge copper wire soldered onto the positive rail. This wasn’t too hard. However, on the ground rail there was this nasty corroded mess of grounding braid, soldered on in spots. This was very difficult to remove since the corrosion prevented proper contact between the old solder and my soldering iron! I applied gobs of paste rosin & attempted to flow some new solder onto the corroded mess, not very successfully. However, after quite an effort and some nasty fumes the braid did come off! I did this work outside but I had a fan blowing the nasty fumes away from me. I was so afraid I was going to detach the ground traces from the PCB with all the heat I had to apply.
braid2.jpgbraid1.jpg

I can now move to washing this PCB & its S-100 edge connectors properly!

-ilkka
 
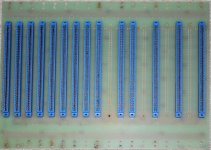
I washed the backplane board 3 times with warm tap water with dish soap. I used a dish brush to remove the dried rodent urine & other residue off the board and connectors. As per Zippysticks' suggestion I also used a tooth brush to really go over the connectors in detail. To finish I used my air compressor to blow the water off the board and out of the connectors. After that I did a final brushing with IPA to flush any remaining water out & hopefully remove some corrosion. The result is below.
top_after_wash.jpg

It is not perfect yet. I will look into some contact cleaner products to see it I can improve it some more. Looking at the edge connectors, the ones that had a card in it look really good. I guess the corrosive rodent urine was not able to get into those connectors since the card blocked access! I looked at the corroded ones with a magnifier & light. To my delight, most of the corrosion occurs at the top of the contact fingers. The inside of the contacts look good, which is what matters. I will go over each connector with a test card inserted and measure the contact resistance with my ohmmeter to determine which contacts need more work.

The bottom of the board has some nasty looking corrosion on the solder surface of some connectors. I'm thinking I may be able to fix that by flowing some new solder onto the corroded stuff, and use solder braid to remove any excessive solder.
bottom_after_wash.jpg

-ilkka
 
Testing, testing....I posted 3 updates about a week ago and still haven't seen them pop up in the board. Is this message coming through?
-ilkka
 
I have been looking into which contact cleaners would be good for the card edge connectors on the back plane and for the front panel switches.

I have seen recommendations on the audio equipment groups to use a product called "CAIG DeOxit D5 Cleaning Solution Spray" which should aid in the removal of the corrosion layer. Those guys use it for potentiometers and switches.

Then afterwards treat the contacts with "CAIG DeoxIT Gold G5 Spray Contact Conditioner" to provide lubrication and protection against further corrosion/oxidation. Is anyone in this group using these product and would you recommend them?

-ilkka
 
Back
Top